Role Management
The Role Management page allows administrators to create, configure, and manage GrantFlow roles and their associated approval policies. This is where you define what privileged access is available and under what conditions.
Overview
Role Management is organized into two complementary areas. In the Role Management area, you define and configure the roles that represent privileged access bundles users can request. In the Approver Policies area, you design the approval workflows and requirements that govern how those role requests are evaluated and approved. Together, these two areas let you decide both what access exists and how that access is granted.
GrantFlow Roles
GrantFlow roles define collections of privileged permissions that users can request activation for.
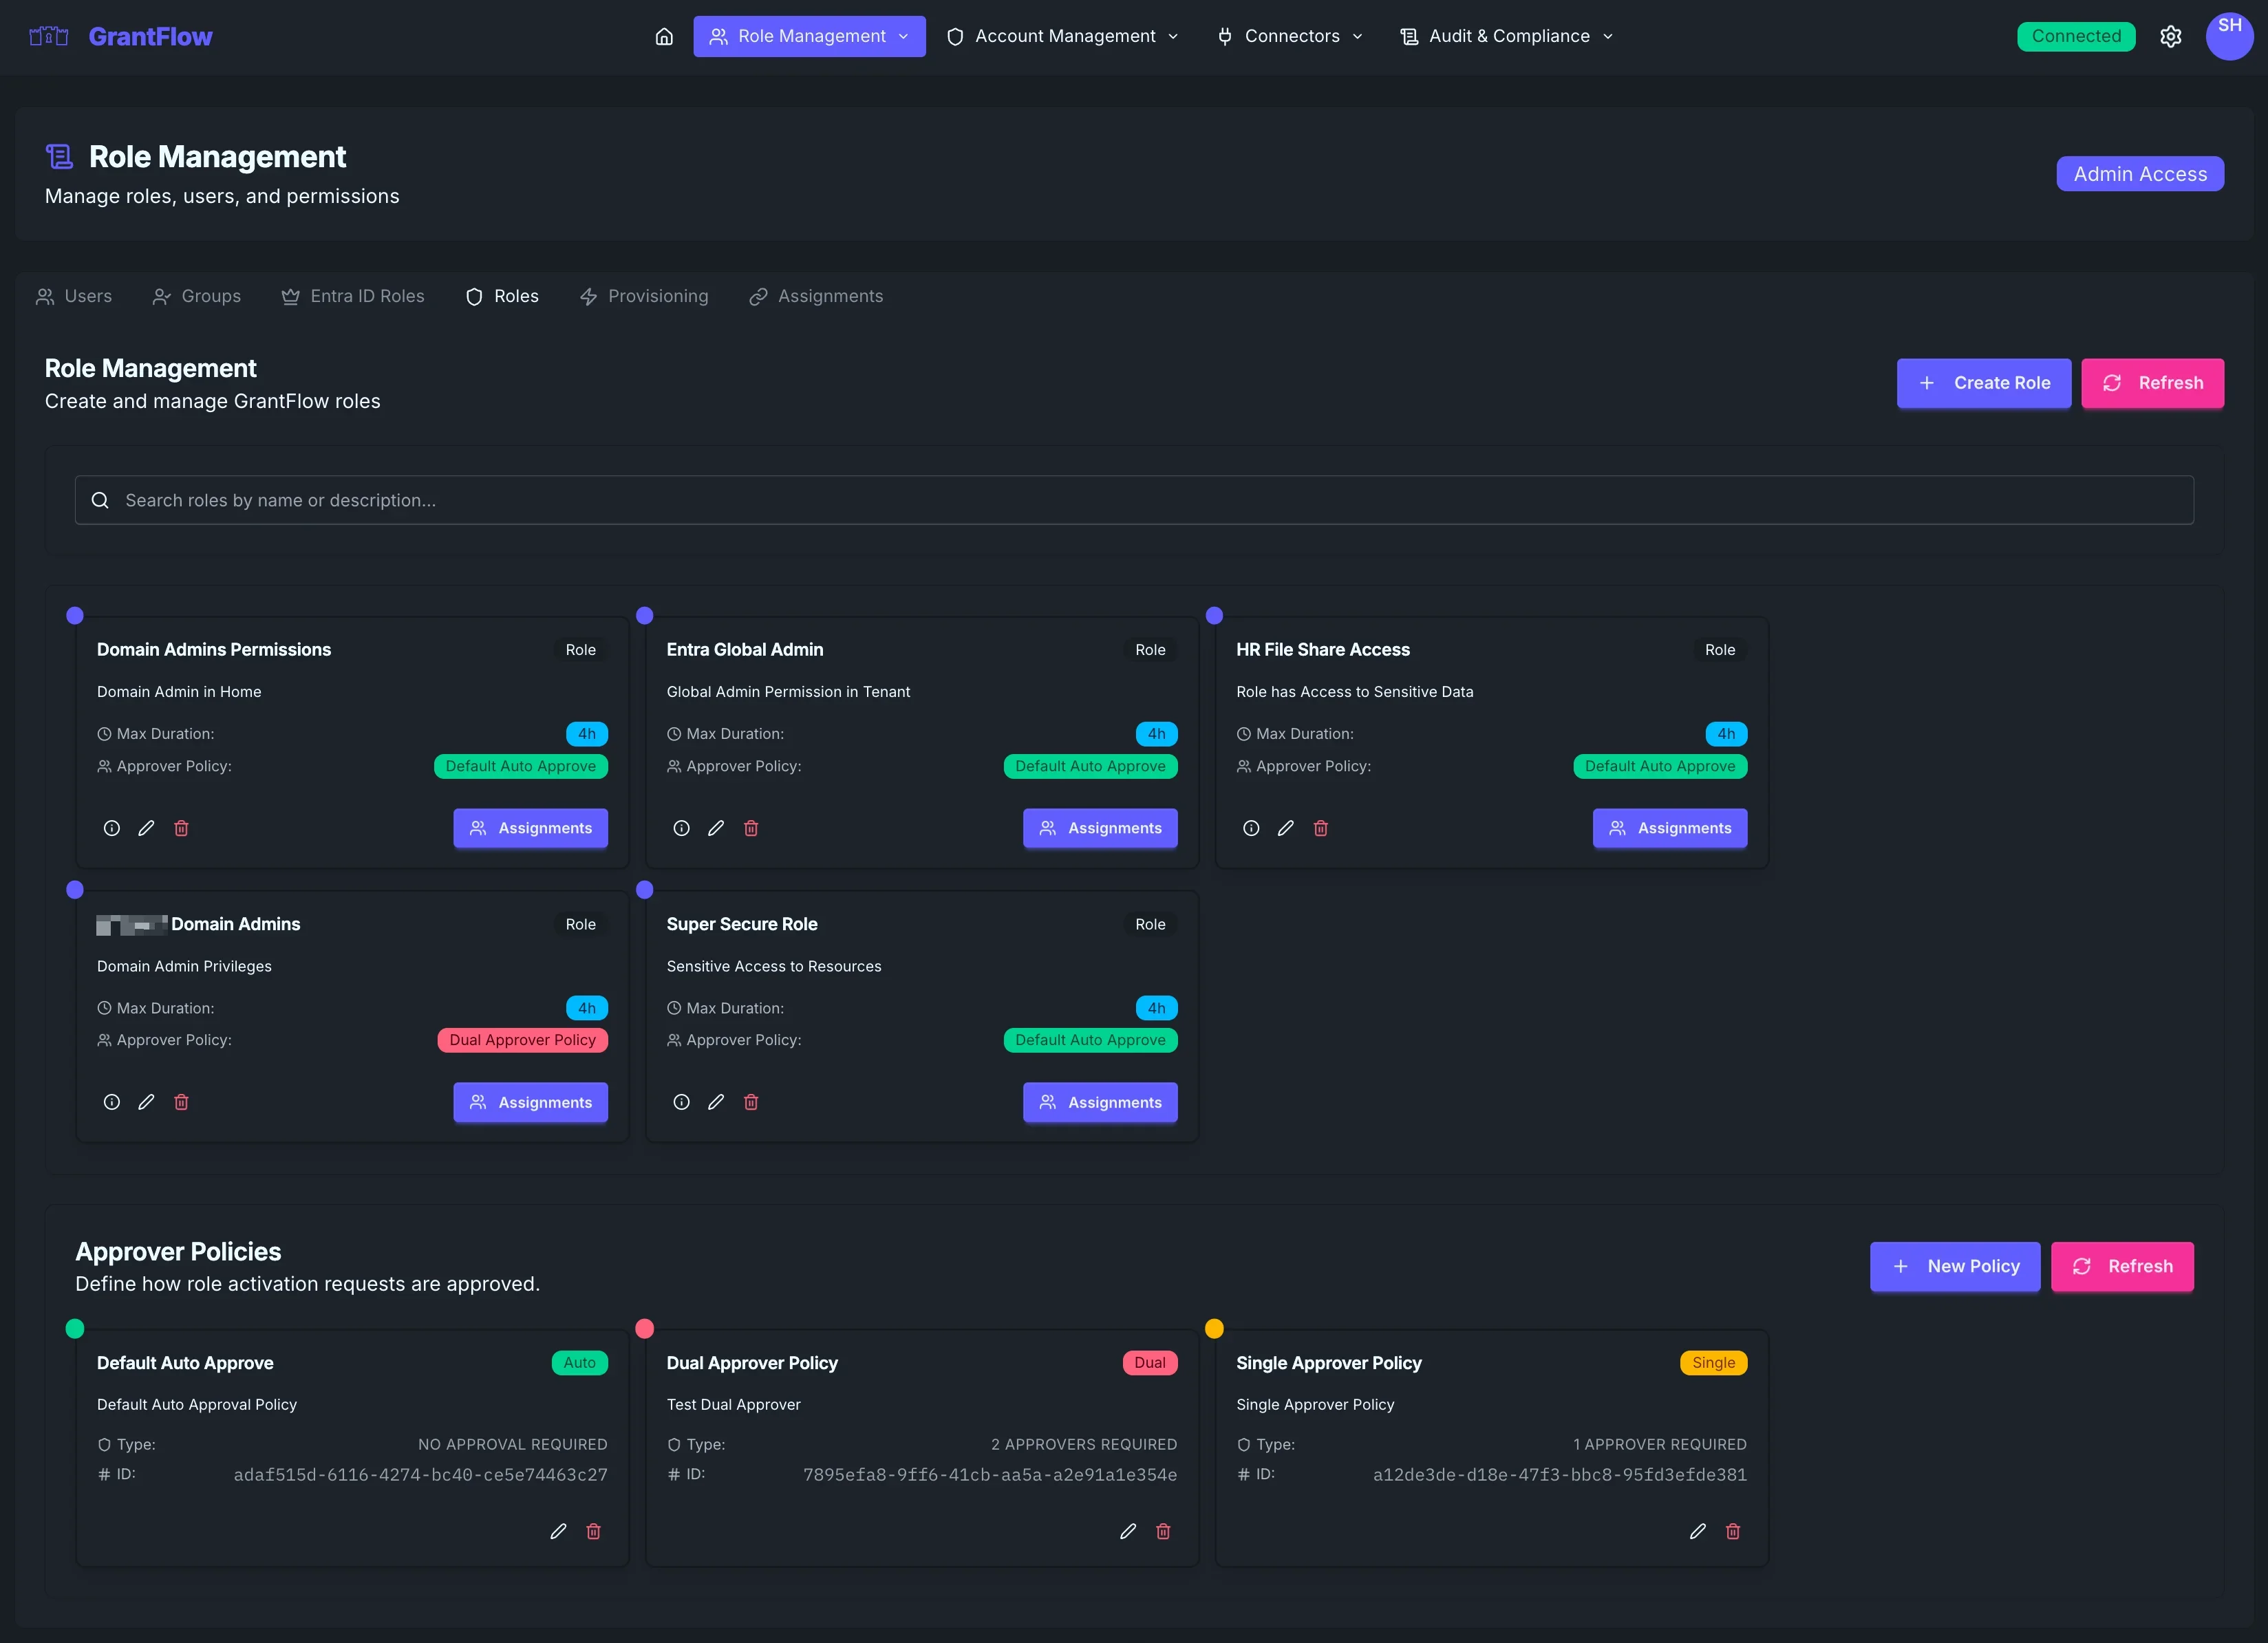
Role Cards
Each role appears as a card that summarizes its most important attributes and available actions at a glance. The card highlights the role name (for example, “Entra Global Admin”) with a simple “Role��” badge so you can quickly distinguish it from policy cards. It also shows a concise description of what the role grants, the maximum activation duration (such as “4h”), and the approver policy that controls its approval flow. From the same card, you can preview the provisioning steps to see exactly what will be granted, open the editor to adjust configuration, delete the role if it is no longer needed, or open assignments to manage who is eligible to request it.
Creating a New Role
Click Create Role to start the guided setup. First, provide basic information: give the role a clear, descriptive name, add a short explanation of its purpose, and set a maximum activation duration that fits the tasks it enables (typically between 15 minutes and 24 hours).
Next, choose the approver policy that should govern requests for this role. The selected policy determines whether requests are auto‑approved, require one approver, require two different approvers, or follow a more customized multi‑approver pattern. Auto‑approve is a good fit for very low‑risk scenarios; otherwise, select an approval flow aligned with the sensitivity of the permissions.
Then configure provisioning — the concrete access the role grants upon activation. You can assign Entra ID roles (either built‑in or custom, such as Global Administrator or User Administrator) and you may include more than one if needed. For on‑premises use cases, you can add the requester to Active Directory security groups from connected domains; membership is temporary and lasts only for the activation duration. If your process requires using privileged scoped accounts, add those accounts to be automatically checked out when the role is activated. Finally, you can extend provisioning with custom actions such as calling APIs, triggering webhooks, or integrating with external systems to complete environment‑specific steps.
To finish, decide who can request this role. You can make individuals eligible directly, target whole groups so all members are included, scope by organizational attributes like department, or define dynamic, attribute‑based rules that automatically keep eligibility in sync with HR or directory data.
Editing Roles
Open any role and click Edit to adjust its configuration. You can change names, descriptions, durations, provisioning steps, and the associated approver policy. Edits are applied immediately. Existing, active activations continue under the previous settings until they expire, while new activations use the updated configuration.
Deleting Roles
Click Delete on a role card to remove a role from the system.
Deleting a role removes existing eligibility and cancels any pending requests. It does not revoke access for activations that are already active, and the action cannot be undone. Ensure you have planned any needed cleanup before proceeding.
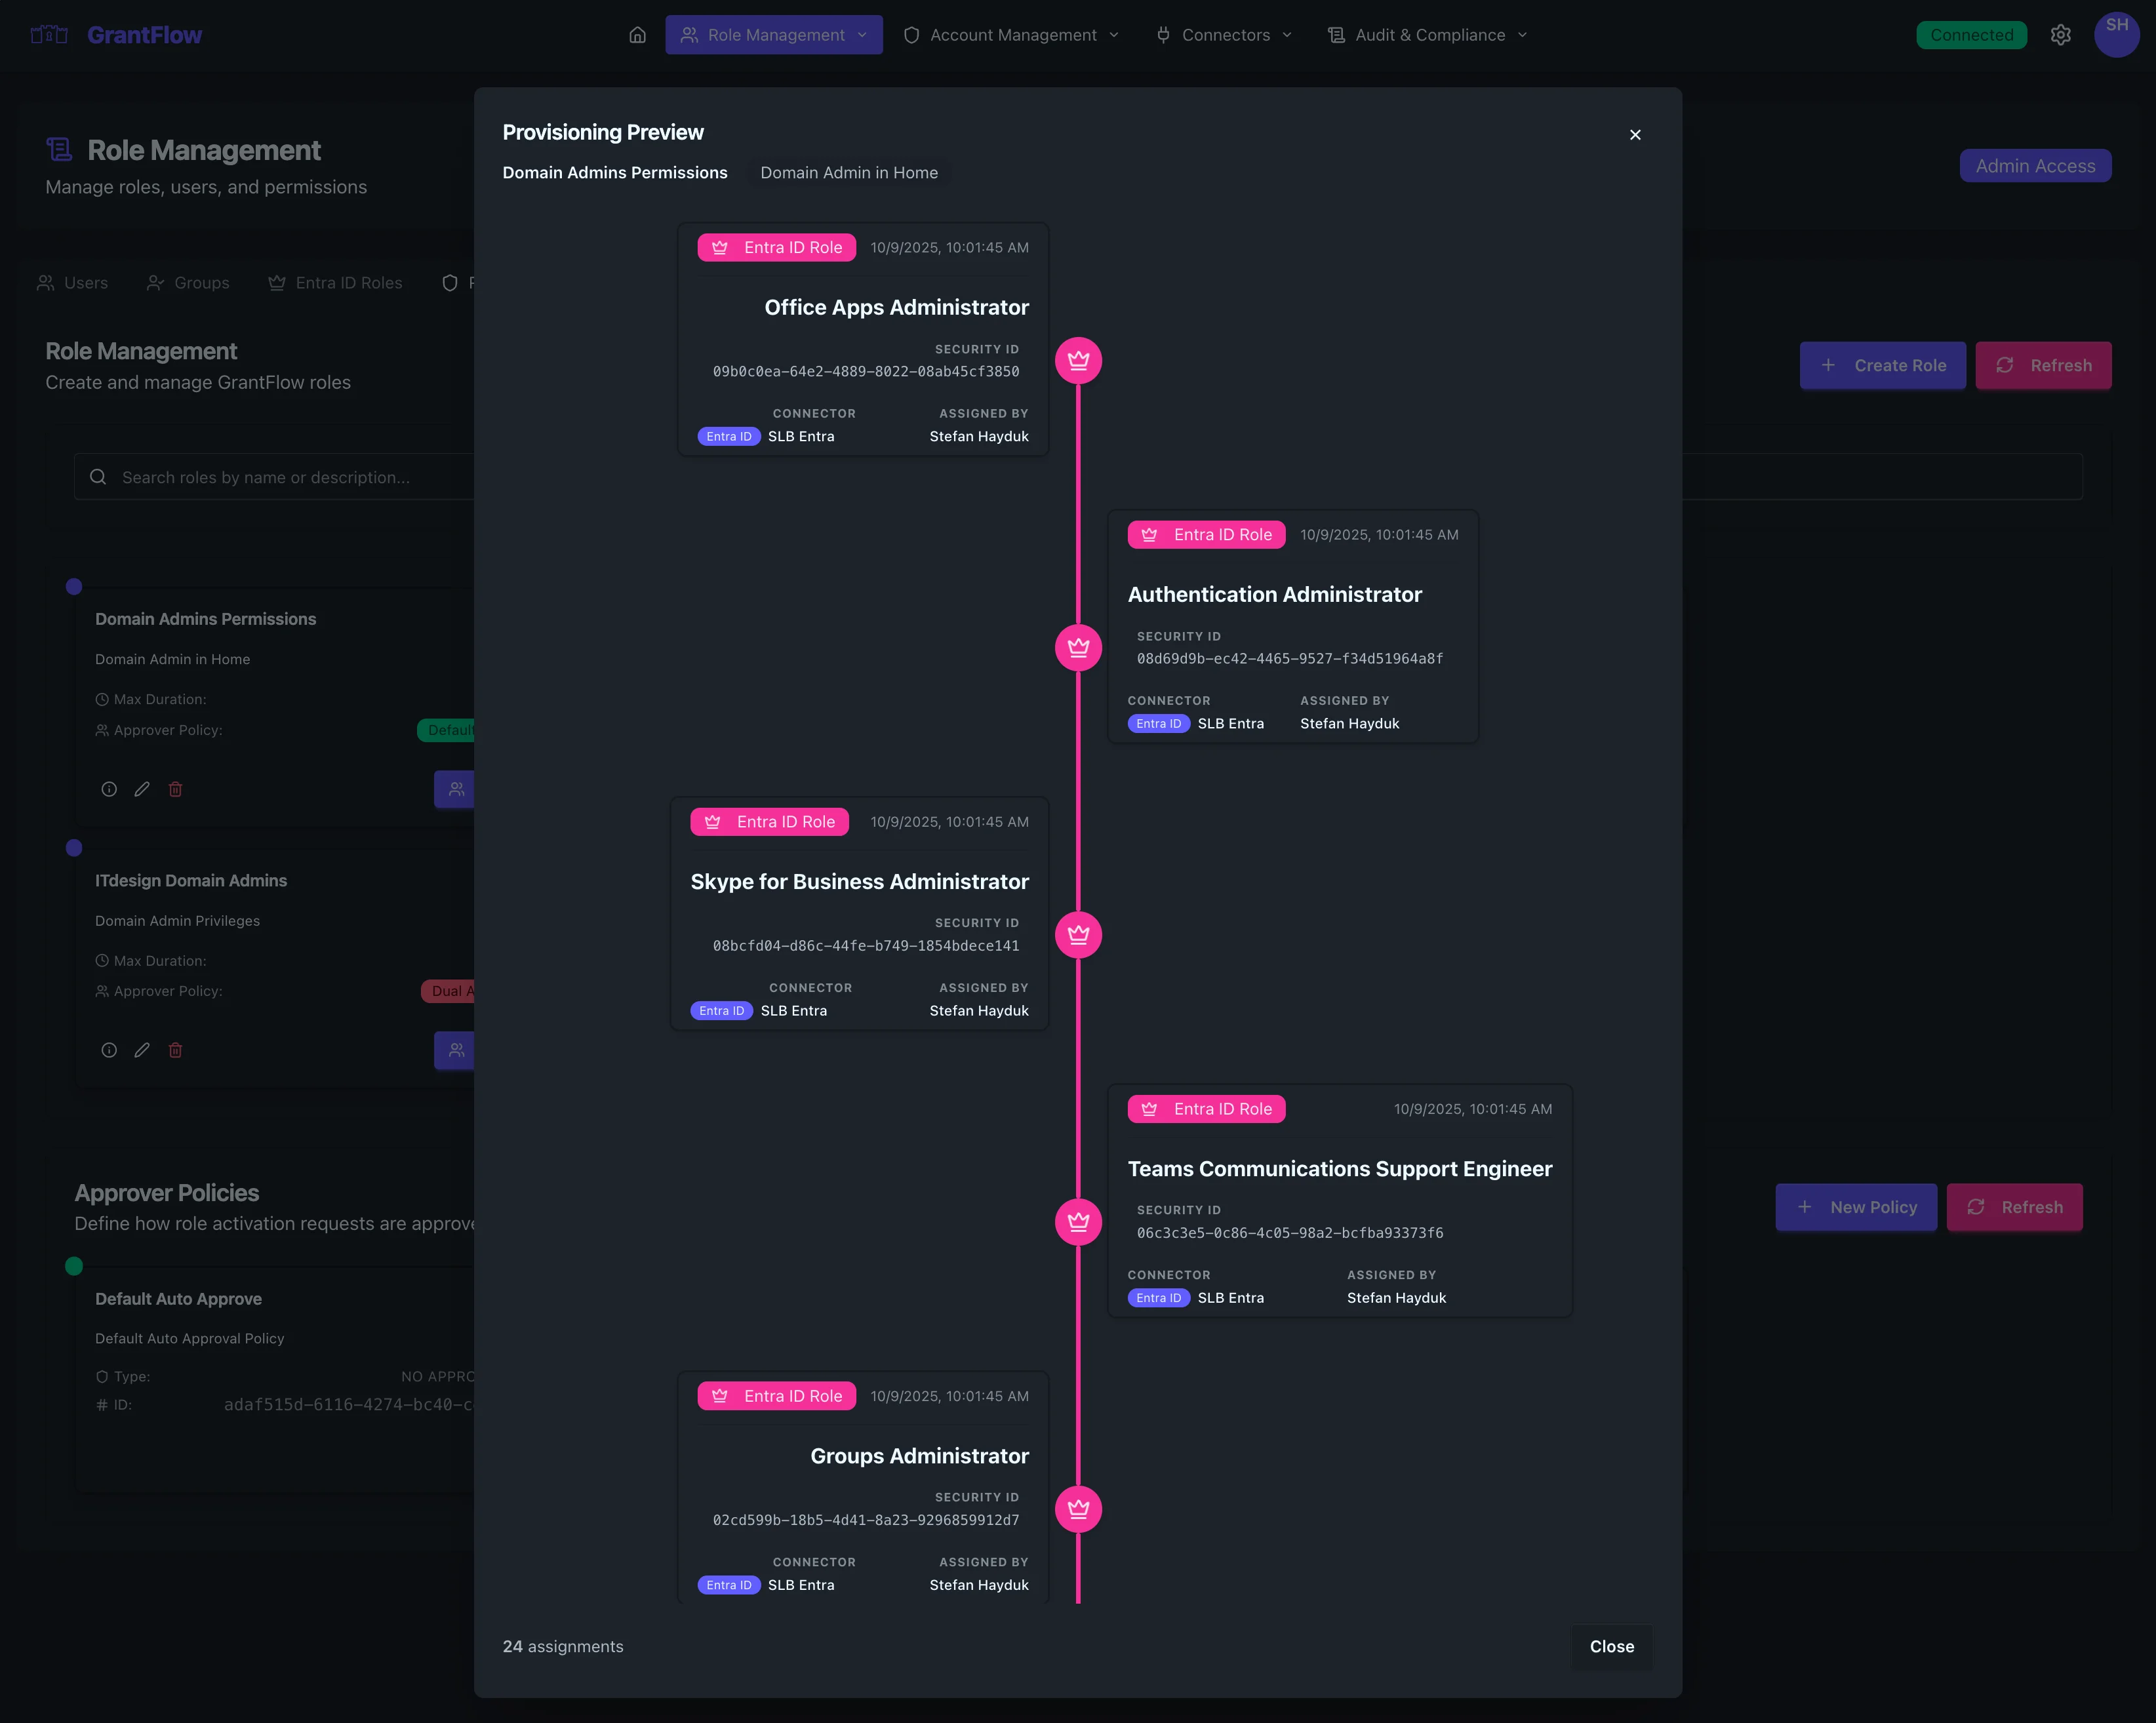
Previewing Provisioning
Use Preview Provisioning to review the exact permissions that will be granted, which connected systems are involved, the groups that will be joined, any privileged accounts that will be checked out, and an estimate of how long the provisioning steps will take. This is a quick way to validate intent before enabling a role or approving a request.
Managing Assignments
Click Assignments on a role to see who can request it and to manage eligibility. The assignment view shows all eligible users along with the source of that eligibility (direct assignment, group membership, or department scope) and the current status. From here you can add individuals or entire groups, and you can optionally apply an expiration date to time‑box eligibility for temporary projects. Removing an assignment immediately prevents new activations for that user or group, while any currently active activations continue until their scheduled expiration.
Approver Policies
Approver policies define how activation requests are approved.
Policy Cards
Policies also appear as cards, making it easy to compare configurations. Each card shows the policy name and a small type indicator (such as Auto, Single, or Dual) so you immediately understand the approval pattern. The description explains the policy’s purpose and any special considerations, the type clarifies the requirement in more detail, and the unique identifier can be referenced in audits, automation, or support requests.
Policy Types
NO APPROVAL REQUIRED (Auto‑Approve)
Requests are activated immediately without human intervention. This model works well for very low‑risk roles or trusted scenarios and still produces a complete audit trail. Many organizations keep a “Default Auto Approve” policy for routine, low‑impact access.
1 APPROVER REQUIRED (Single Approver)
Requests must be approved by one designated approver or any member of a defined approver group. The first available approver can make the decision, which helps keep cycle times short. A typical example is a “Single Approver Policy” for moderate‑risk roles.
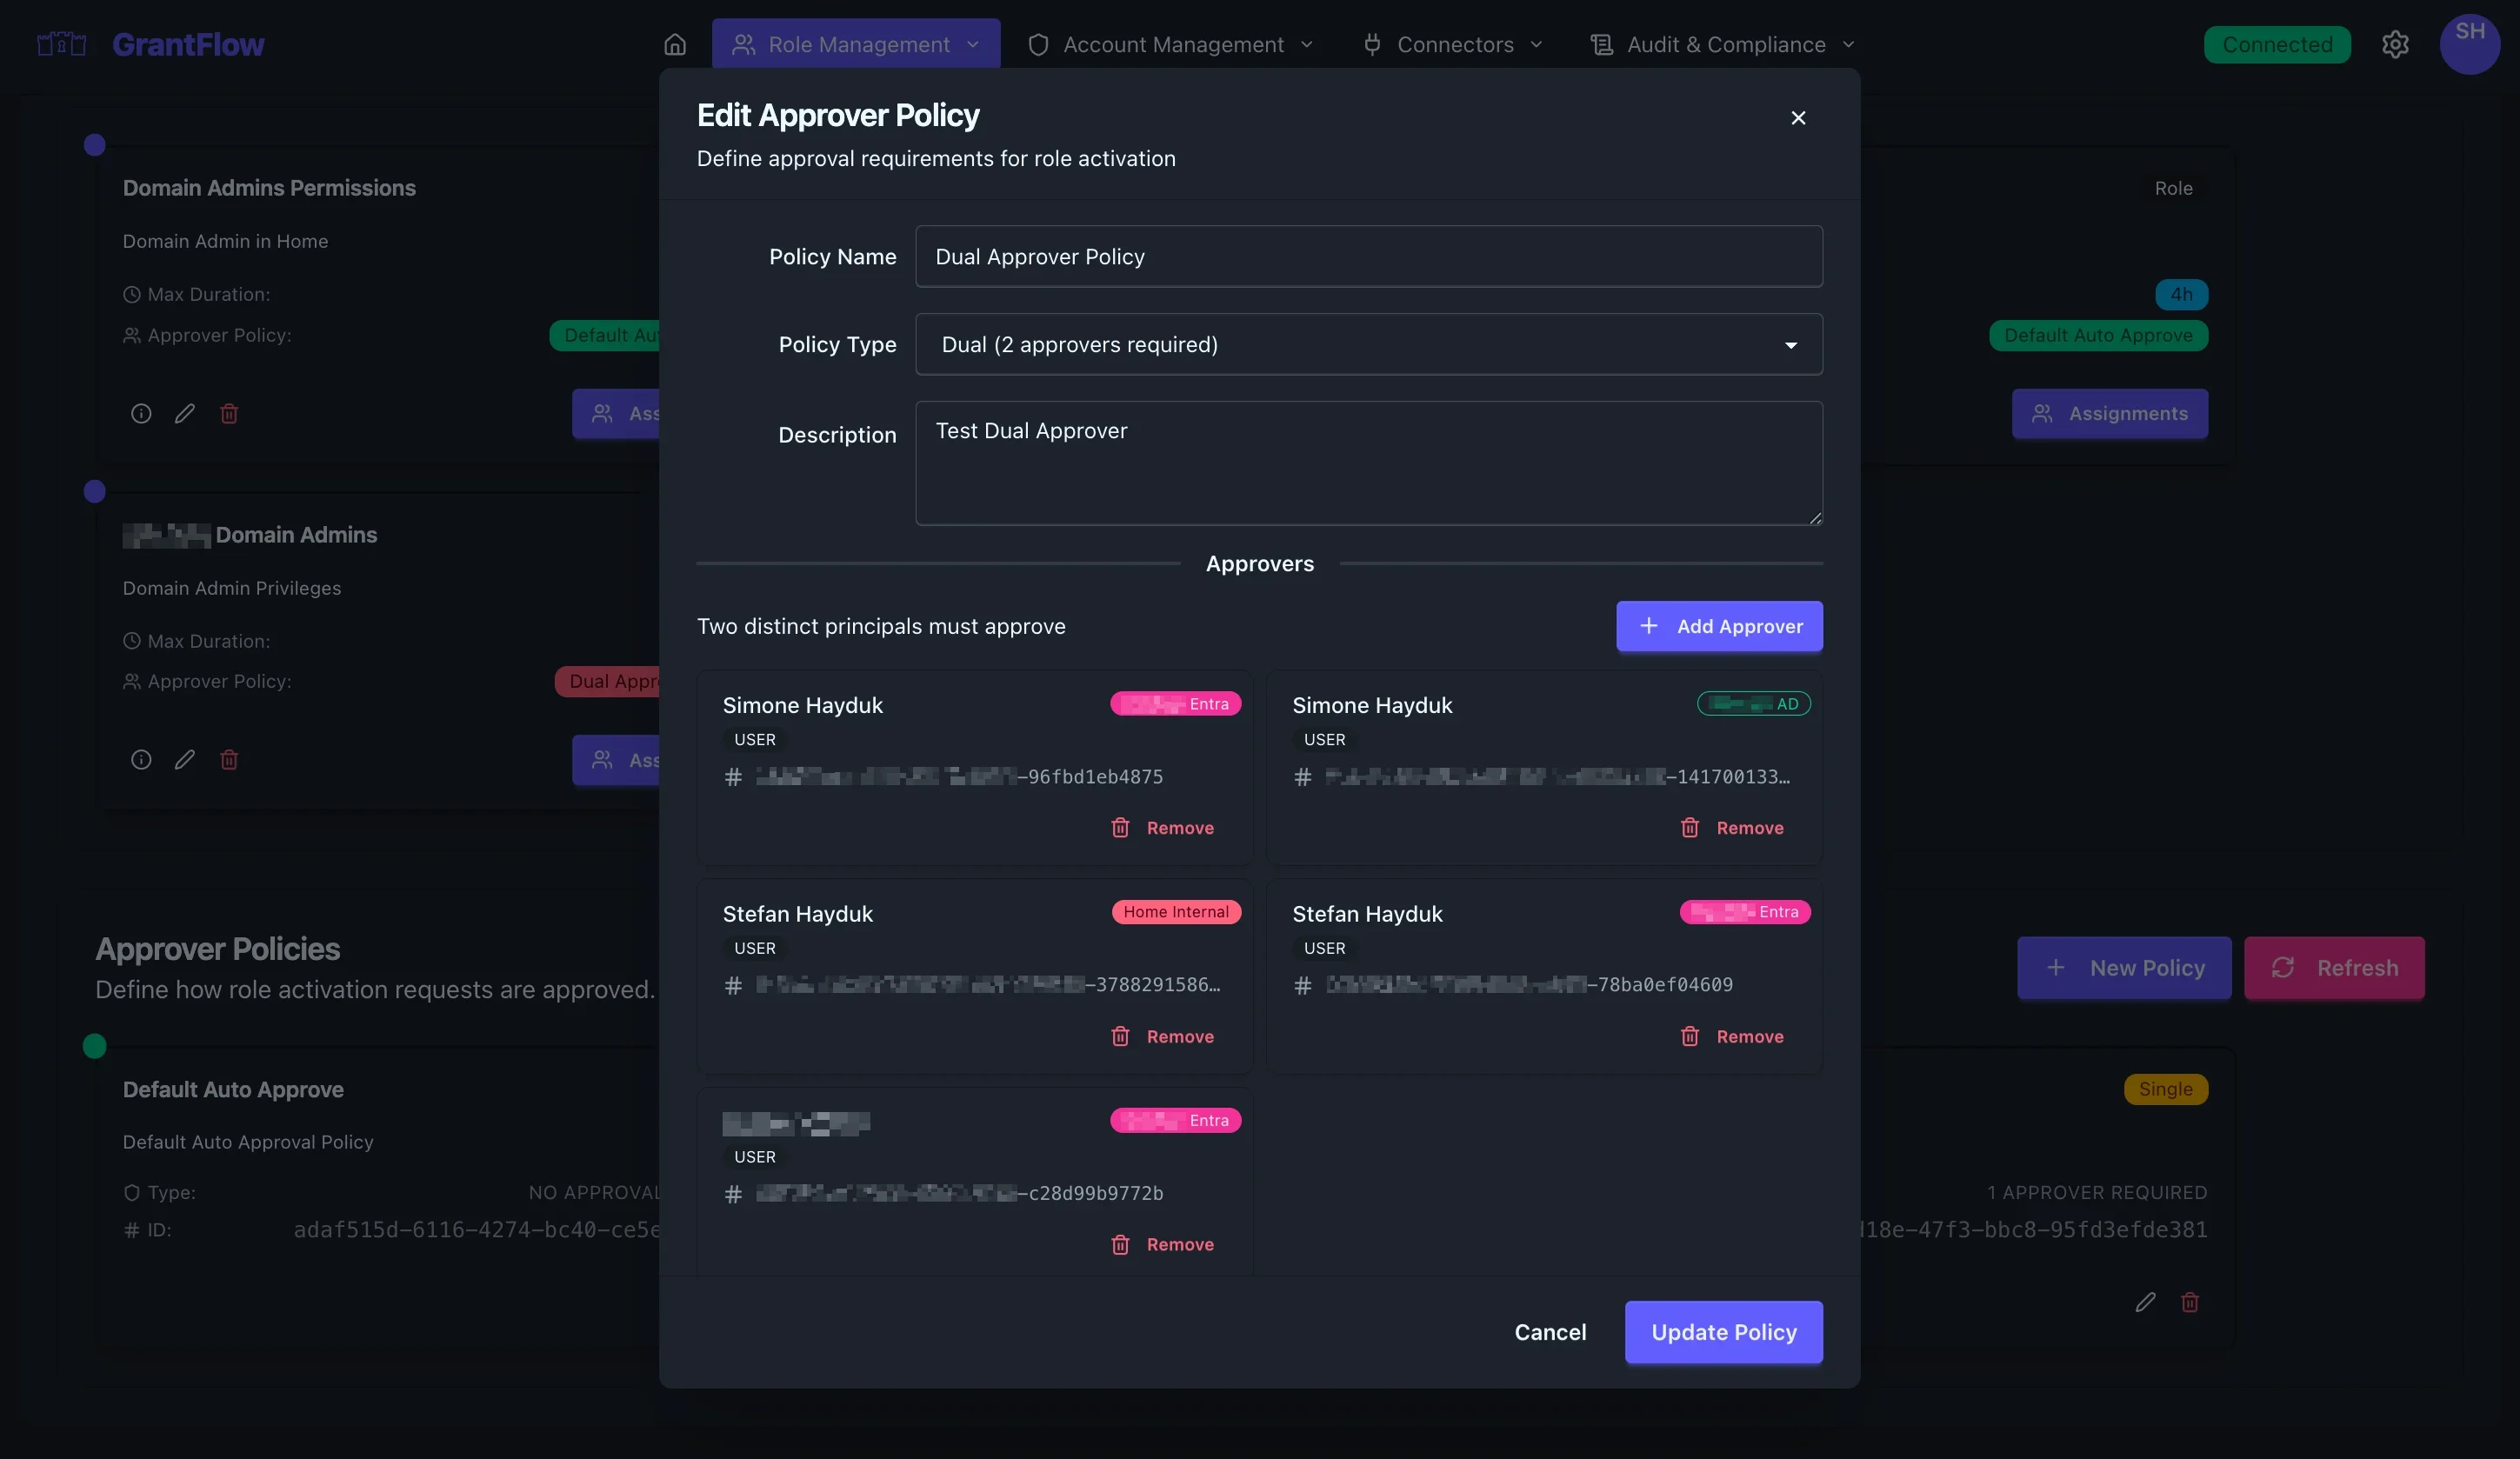
2 APPROVERS REQUIRED (Dual Approver)
Requests require approval from two different approvers before activation can proceed. This dual control significantly reduces risk for high‑sensitivity roles. Both approvals must be received within the policy’s time window.
N APPROVERS REQUIRED (Multi‑Approver)
Requests are approved only after a configurable number of approvers have approved. This model is flexible enough for complex workflows and can be tailored to require specific approver roles or sequences when needed.
Creating a New Policy
Click New Policy to define the approval flow. Start by entering a descriptive name, explaining the policy’s purpose and common use cases, and selecting the approval type that best matches your risk posture. For auto‑approve policies, no approver assignment is required. For single‑approver flows, specify the users or groups who can approve; any one of them can make the decision. For dual or multi‑approver flows, list the approvers or approver groups, set how many distinct approvals are required, and choose whether approvals must occur sequentially or can happen in parallel.
You can then refine behavior with advanced options. Set a timeout to control how long a request can wait for approvals before it expires, configure escalation rules that notify additional stakeholders if approval is delayed, enable or tailor notifications to keep approvers informed, and optionally restrict approvals to working hours when your governance model requires it.
Editing Policies
Open any policy and click Edit to change its configuration. You can update approver assignments, adjust the number of required approvals, tune timeouts and escalations, and modify notifications to fit your operational rhythms.
Policy changes affect new requests only. Pending requests continue using the original policy to ensure consistency and auditability.
Deleting Policies
Click Delete on a policy card to remove it from the catalog.
You cannot delete a policy that is still referenced by one or more roles; reassign those roles to a different policy first. Additionally, built‑in system policies are protected and cannot be deleted.
Best Practices
Role Design
Keep roles focused on a clear purpose and avoid “super‑admin” catch‑alls that mix unrelated privileges. When permissions differ meaningfully, split them into separate roles (for example, a read‑only role and a write role). Set the maximum activation duration to match the typical task length and default to the shortest secure window; if necessary, allow extensions rather than starting with long activations. As you name roles, prefer descriptive, business‑friendly names that indicate the privilege level and target system, such as “Production Database Read‑Only.” Remember to consider time zones when setting durations and scheduling maintenance windows.
Approval Policy Strategy
Adopt a risk‑based approach to approvals. Low‑risk roles can often be auto‑approved without sacrificing safety, while medium‑risk roles typically benefit from a single approver. High‑risk roles should require two different approvers, and critical scenarios may warrant multi‑approver policies with explicitly defined approver roles. Select approvers who understand the role’s impact and who are available across time zones; providing multiple approvers reduces bottlenecks. Document approver responsibilities so decisions are consistent. Finally, plan for escalation by defining clear paths, setting reasonable timeouts, configuring backup approvers, and documenting emergency procedures in advance.
Assignment Management
Review role assignments on a regular cadence (quarterly is a common baseline) to remove eligibility that is no longer needed and to reflect job changes. Apply least‑privilege principles by granting only the roles users actually require and by removing access promptly when responsibilities change; track a brief business justification to support audits. Whenever possible, favor group‑based assignment over one‑off individual assignments. This approach scales better, aligns with organizational structure, and automatically adapts eligibility as employees join, move, or leave teams.
Common Workflows
Creating a New Privileged Role
Begin by clarifying the need: what access is required, who needs it, how frequently it will be used, and what risks it introduces. If you don’t already have a suitable approver policy, create one by deciding on the approval requirements, selecting approvers, and configuring notifications. Then create the role, entering the basic information, defining the provisioning steps, choosing the approver policy, and setting a maximum duration that fits the scenario. Assign eligibility to the right users or groups and verify that assignments reflect your intention, recording the business justification where appropriate. Finally, test the flow end‑to‑end: request activation as a representative end user, confirm that provisioning completes as expected, observe the approval workflow, and verify that the right notifications are sent.
Modifying Approval Requirements
When changing approval requirements, start with an assessment of the current policy: look at usage patterns, approval throughput, and stakeholder feedback. If the shift is substantial, create a new policy rather than altering the existing one so ongoing requests are not disrupted. Configure approvers and notifications to match the new approach, and then re‑assign affected roles to the new policy. Communicate the change to users, update documentation, and monitor approval times to ensure the new process removes bottlenecks without compromising control.
Role Lifecycle Management
A well‑managed role has a clear lifecycle. During creation, you gather requirements, choose the approver policy, set up initial assignments, and document the rationale. In active use, you monitor activations and approvals, track how the role is used, and collect feedback from requesters and approvers. Periodic reviews validate that assignments are still appropriate, identify potential misuse, and drive updates to configuration, duration, or approvals as needed. When a role is no longer required, retire it by removing assignments, cancelling any pending requests, archiving its configuration for audit purposes, and recording the reason for decommissioning.
Troubleshooting
Role Not Appearing for Users
If a role does not appear for a user, verify that the user is actually eligible, confirm the role is enabled, and ensure the user satisfies any dynamic assignment criteria. Also check the status of the relevant connector, as outages or misconfigurations can prevent roles from showing up.
Provisioning Failures
Provisioning failures are often caused by connector problems, outages in the target system, missing permissions, or — in the case of on‑premises Active Directory — agent connectivity issues. Review logs for detailed errors and validate connectivity and credentials before retrying.
Approval Workflow Issues
If approvals seem stalled or inconsistent, make sure the assigned approvers are active and have the necessary permissions, check that notifications are being sent as expected, and review the underlying policy configuration for mismatches with your intent.
Security Considerations
Sensitive Roles
For sensitive roles, use multiple approvals, keep activation durations short, and limit eligibility with strict criteria. Add enhanced monitoring and schedule more frequent access reviews so issues are detected and addressed quickly.
Separation of Duties
Maintain separation of duties by ensuring the people who create roles are not the ones who approve them, and that approvers are not the same users who are eligible for those roles. Apply additional scrutiny to admin‑level roles and document any exceptions thoroughly.
Audit Trail
GrantFlow records changes to roles, assignments, and policies so you can trace what happened and why. Establish a practice of regular audit reviews to validate compliance and to spot trends that may suggest improvements to your governance model.
Keyboard Shortcuts
To speed up navigation, you can use keyboard shortcuts: Ctrl/Cmd + N creates a new role, Ctrl/Cmd + F searches roles, and Esc closes open dialogs.